Validation Process for OV & EV SSL Certificate

May 30, 2025

What Happens After You Purchased a OV & EV SSL Certificate

After you've purchased OV/EV SSL, follow the below steps to activate and implement HTTPS on your website or device.
  1. Enroll the SSL in your HTTPS.IN account.
  2. Complete DCV (Domain Control Validation)
  3. Complete the company verification process.
  4. Install the SSL on your Webserver.
In this knowledge base, we will discuss various domain control validation (choose anyone) & company verification process for OV/EV SSL certificates to get issued.

Company Verification:

The company/organization's validation process requires the CA to verify its current and legitimate registration in corporate registries and ensure that it is not listed in any anti-terrorism databases, fraud, phishing, or government-restricted entities.

Furthermore, the CA ensures that the organization that requests a certificate is the same organization that will receive it.

The following are the available options to validate a company.

Option A (Most popular):
Conduct legal existence checks through public government databases by using the company name or unique identification number such as a registration number. For example MCA (Ministry of Corporate Affairs) Database.

Option B:
Verify the company through public third-party databases such as Duns & Bradstreet, Hoovers, Justdial, Google Business Profile, etc.

Option C:
Confirm the company address by providing one of the following documents: Articles of Incorporation (with address), Partnership Deed in case of Partnership firm, Government Issued Business License (with address), Copy of a recent company bank statement (you may blacken out the Account Number), Copy of a recent company phone bill, Copy of a recent major utility bill of the company (such as power bill, water bill, etc.) or current lease agreement for the company.

Note:
  1. For Government organizations, CA checks the listing in https://igod.gov.in/.
  2. For Co-Operative Banks, CA verifies registration with RBI by sending an emai

Call Verification Process

The ultimate step includes a call back procedure. SSL vendors use an automated call back system to validate OV/EV SSL, in which their team contacts the verified phone number and provides a verification code.

The CA verifies the organization's phone number by checking reliable directories like Google Business, DUNs & Bradstreet, etc., and making a call to the listed number.

If they can't reach anyone, an email may be sent to schedule a call back.

Additional Step for EV SSL Certificate:

After the customer complete the above-mentioned validation process, the SSL Vendor (Sectigo or DigiCert Family) will send an email approving the EV to the certificate's point of contact. When it is approved, the certificate will be issued.

Domain Control Validation (DCV) Methods 

  1. DNS TXT Record
TXT Record for Validating and Revalidating DigiCert/Thawte/GeoTrust/RapidSSL Certificates: 
  1. Log in to your domain's hosting Control Panel 
  2. Select DNS Zone Manager 
  3. Create a new TXT Record with the unique value from your Certificate Enrolment Page 
  4. Set TTL to 3600 or set to default and save. 
  5. Wait for the record to propagate. 

TXT Record for Validating and Revalidating Sectigo Certificates:
  1. Navigate to Domains.
  2. Select the domain to be validated and click Validate.
  3. Select the DNS TXT DCV method.
  4. Click Start.
  5. Add the TXT record to your domain’s DNS settings.
    1. Sign into your domain registrar’s website or your DNS provider.
      Note: Your domain registrar’s website is where you purchased your domain.
    2. Locate the option to add a new DNS record, and select TXT as the record type.
    3. In the Label/Host field, enter the TXT Host/Label value provided.
    4. In the Destination/Target field, enter the TXT Target/Destination value provided.
    5. Save the changes.
  6. Click Submit.
  7. (Optional) Click Check Now to check the status of the DNS TXT record.
  8. Click Close.

  1. DNS CNAME Record
To complete domain verification using DNS, you'll need to add a CNAME or TXT record depending on your SSL vendor (Sectigo or DigiCert Family). Before your certificate can be issued, the new record needs to be viewable by the public using an online DNS lookup tool. It may take 24-48 hours for your record to propagate, which is outside our control.

CNAME Record for Sectigo (formerly Comodo) certificates: 
  1. Log in to your domain's hosting Control Panel 
  2. Select DNS Zone Manager. 
  3. Create a new CNAME Record with the unique values from your certificate enrollment page.
  4. Set TTL to 3600 or set to default and save. 
  5. Wait for the record to propagate.

If this method does not work, you can opt for an alternative verification method by selecting "Change Approver Method" on your Certificate Enrollment page.

CNAME Record for DigiCert Certificates: 

Option 1: Create the DNS CNAME record with the static prefix _dnsauth
    1. Go to your DNS provider’s site and create a new CNAME record.
    2. In the hostname field (or equivalent), enter _dnsauth.
    3. In the record type field (or equivalent), select CNAME.
    4. In the target host field (or equivalent), enter [random_value]. dcv.digicert.com to point the CNAME record to dcv.digicert.com.
    5. Select a Time-to-Live (TTL) value or use your DNS provider's default value.
    6. Save the record.

Option 2: Create the DNS CNAME record
  1. Go to your DNS provider’s site and create a new CNAME record.
  2. In the hostname field (or equivalent), enter the random value that you copied from your CertCentral account.
  3. In the record type field (or equivalent), select CNAME.
  4. In the target host field (or equivalent), enter dcv.digicert.com to point the CNAME record to dcv.digicert.com.
  5. Select a Time-to-Live (TTL) value or use your DNS provider's default value.
  6. Save the record.

How to Check if Your Record is Ready!

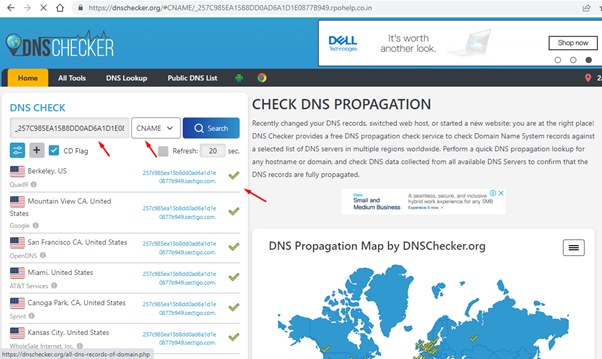
  1. Check if your CNAME record is validated using a DNS lookup tool like https://www.whatsmydns.net/. Enter the value from your Host Name field and select CNAME. If the "Points To" value is displayed with green check marks, your CNAME record is propagated, and your SSL should be issued soon.


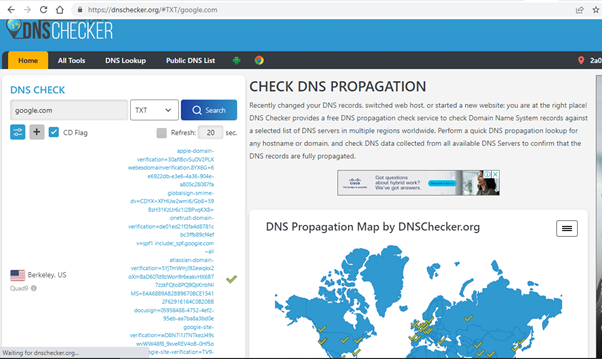
  2. To check if your TXT record has propagated, use a DNS record lookup tool such as https://www.whatsmydns.net. Input your domain and select TXT from the drop-down menu, then hit “Search”. If you can see your TXT record’s unique value with green check marks, your TXT record is propagated, and your SSL should be issued soon.


  1. HTTP/HTTPS File Verification
If you don’t have access to the DNS server to create the DNS record to complete the domain validation process, you can choose HTTP record creation or .txt file upload to your website to complete the domain validation process.

Please note for wildcard certificates you must complete the domain validation process by creating DNS record or via Email validation, HTTP record or .txt file upload to your website is not available for the same.

Also, when requesting an SSL certificate for an IP address, DigiCert will only use file-based authentication for domain validation.

To use the file-based method for SSL certificate validation, you need to place the unique verification file at a specific URL. Follow the steps below:
  1. Create a folder titled ".well-known" in your server's public or home directory.
  2. Generate a new folder called "pki-validation" under the "well-known" directory.
  3. Place the distinct text file that you downloaded from your Certificate Enrolment page into the folder named "pki-validation". This ensures that the file is properly validated.

Example:
domain.com/.well-known/pki-validation/[a unique file name].txt


If this method does not work, you can opt for an alternative verification method by selecting "Change Approver Method" on your Certificate Enrollment page.


Have any Questions

Call HTTPS

If you have any questions, feel free to call us