CSR generation on Juniper Secure Access VPN
Mar 26, 2026
To generate a CSR (Certificate Signing Request) on a Juniper Secure Access VPN, you can follow these steps:
Step 1: Generating your CSR:
-
Log in to the Juniper Secure Access VPN web interface as an administrator.
-
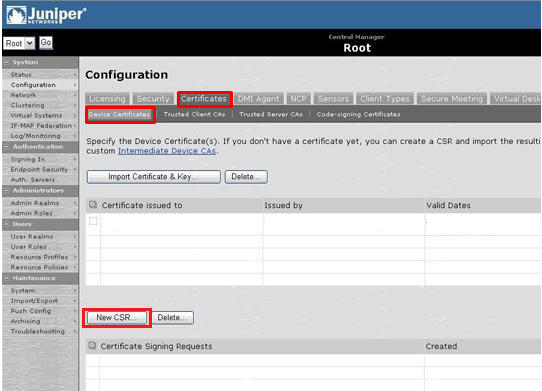
Navigate to the Configuration tab and select Certificates.
-
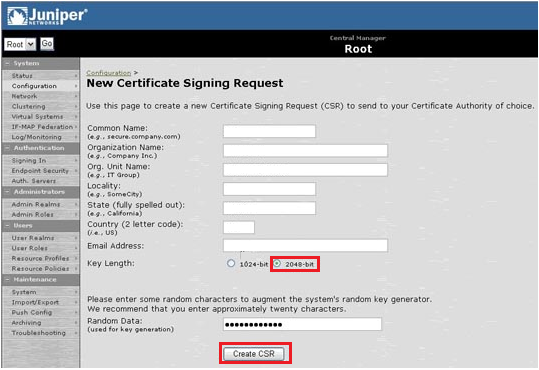
Click the Generate button to create a new CSR.
-
Enter the required information for the CSR, such as the common name (CN), organization (O), and country (C).
-
Common Name: The fully-qualified domain name, or URL, you're securing. for example "
www.domain.com".
If you are requesting a Wildcard certificate, add an asterisk (*) to the left of the common name where you want the wildcard, for example *.domain.com.
-
Organization Name: If the company or department has an &, @, or any other symbol using the shift key in its name, the symbol must be spelled out or omitted, in order to enroll. Example: XY & Z Corporation would be XYZ Corporation or XY and Z Corporation.
-
Organizational Unit: The Organizational Unit (OU) field is the name of the department or organization unit making the request. To skip the OU field, press Enter on the keyboard.
-
Locality or City: The Locality field is the city or town name, for example: Boston. Do not abbreviate. For example: Saint Louis, not St. Louis
-
State or Province: Spell out the state completely; do not abbreviate the state or province name, for example: Massachusetts
-
Country Name: Use the two-letter code without punctuation for country, for example: US or CA.
-
Select the appropriate key size and signature algorithm for the CSR.
-
Click the Generate button to create the CSR.
-
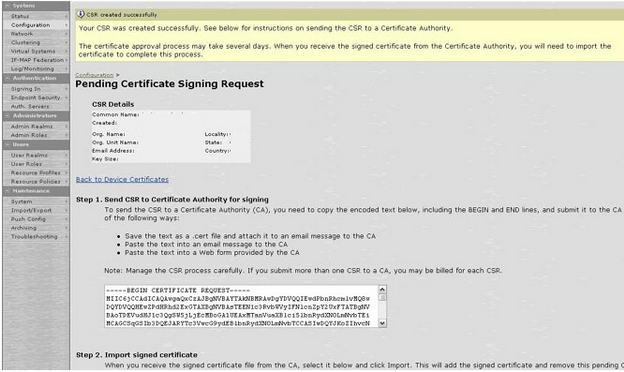
The generated CSR will be displayed on the screen. You can copy the CSR and paste it into a text editor to save it as a .csr file.
-
Submit the CSR to a certificate authority (CA) to have it signed and obtain a certificate.
- Once you have received the signed certificate, you can upload it to the juniper VPN by going to the configuration > Certificates > Server Certificates > Import.
- Finally, you need to bind the certificate to the VPN. Go to the Configuration > Certificates > SSL VPN and select the certificate that you just imported.
