CSR Generation Steps IIS 8 / 8.5
Mar 26, 2026This guide will provide a comprehensive step-by-step process for creating a CSR for IIS 8 / 8.5
Step 1: Open the IIS Manager
- Go to the Start menu and type in "IIS Manager" and press Enter.
- Alternatively, you can also open the IIS Manager by clicking on the server name in the Server Manager and then clicking on the IIS Manager option.
Step 2: Select the server you want to create the CSR for
- In the IIS Manager, expand the tree on the left-hand side to find the server you want to create the CSR for.
- Right-click on the server and select "Server Certificates" from the drop-down menu.
Step 3: Generate a new CSR


- In the Server Certificates window, click on the "Create Certificate Request" option.

- Fill out the necessary information in the Distinguished Name Properties window, including the Common Name, Organization, Organizational Unit, City/Locality, State/Province, and Country.

Step 4: Choose a cryptographic service provider
- Select the cryptographic service provider you want to use from the drop-down menu. The default is "Microsoft RSA SChannel Cryptographic Provider."
Step 5: Choose the key length
- Select the key length you want to use for the CSR. The default is 2048 bits, but you can choose a higher key length if desired.
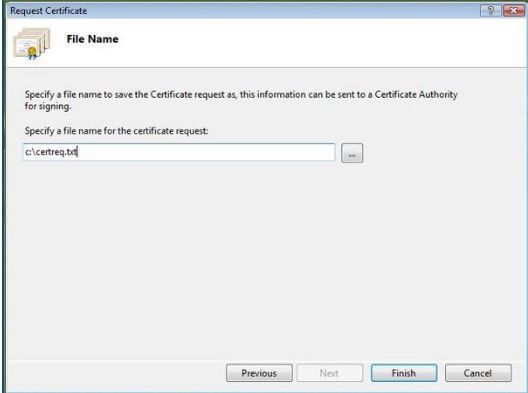
Step 6: Save the CSR
- Click on the "Finish" button to create the CSR.
- Save the CSR to your computer by clicking on the "Save" button and selecting a location to save the file.

Step 7: Submit the CSR to the certificate authority
- Submit the CSR to the certificate authority of your choice for them to issue a certificate based on the information provided in the CSR.
Step 8: Install the certificate
- Once you receive the certificate from the certificate authority, install it on your IIS 8 or 8.5 server by going back to the "Server Certificates" window in the IIS Manager, and clicking on the "Complete Certificate Request" option.
- Select the certificate file and provide a friendly name for the certificate.

Step 9: Assign the certificate to a website
- In the IIS Manager, go to the "Sites" folder and select the website you want to assign the certificate to.
- In the "Actions" pane, click on "Bindings" to open the Site Bindings window.
- Click on "Add" to add a new binding and select "https" as the type and select the certificate you just installed from the drop-down menu.
- Click "OK" to save the changes and your website is now protected with a secure SSL certificate.
